SimpliPyTEM-GUI
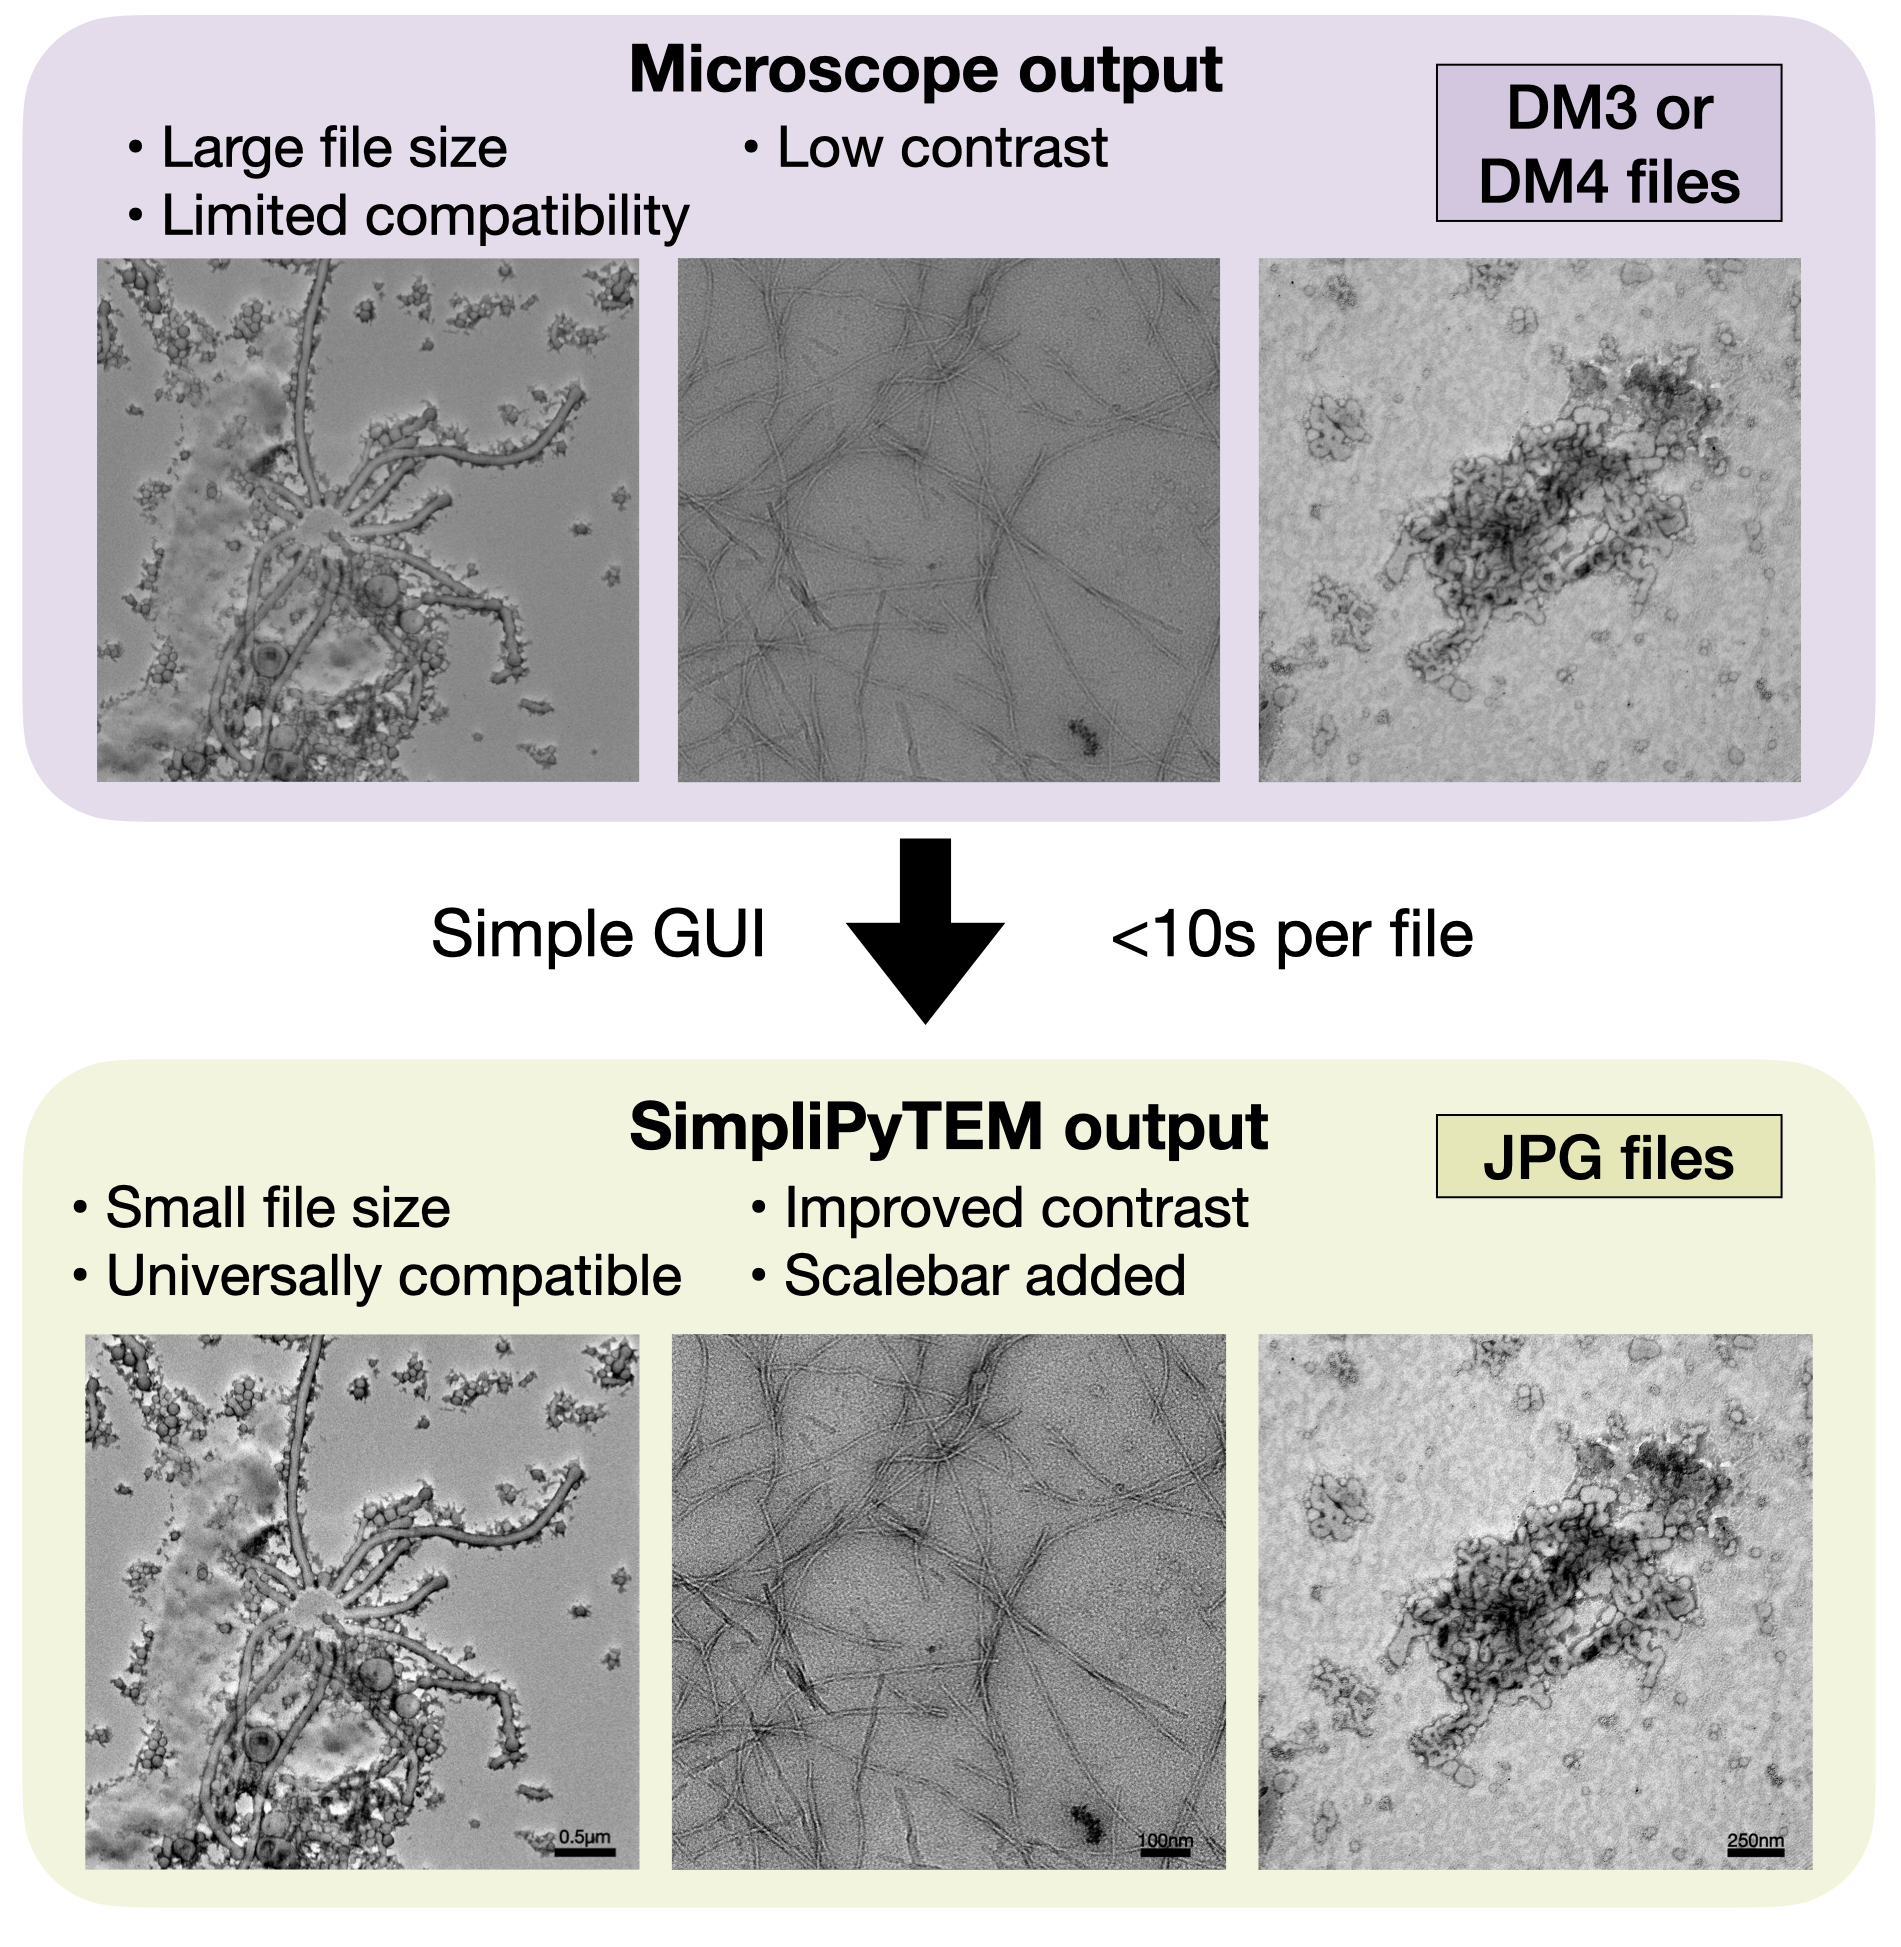
While using python will allow one to get the most out of the package, for many learning python is intimidating, and time ends up being wasted manually processing images. Here I am introducing a GUI-based pipeline to create high quality JPEGs, with a good size scale bar automatically added, minor filtering (median and gaussian filtering) available, and video (or dose-fractionation) processing options included.
Combined with this, there are options to create html or pdf documentss containing the images (and videos in the case of html) generated. These documents can be a very useful way to easily evaluate the images/videos taken in an TEM experiment.
Usage - Section 1: Image generation
Before starting, please follow the installation instructions on on the homepage of the documentation
App usage is fairly simple, and is presented in a stepwise fashion here;
Open terminal and first call:
conda activate SimpliPyTEM (assuming you installed in a new conda environment as the installation instructions said.)
To activate the python environment in which you installed the SimpliPyTEM package, followed by :
SimpliPyTEM-GUI
The GUI should appear as follows:
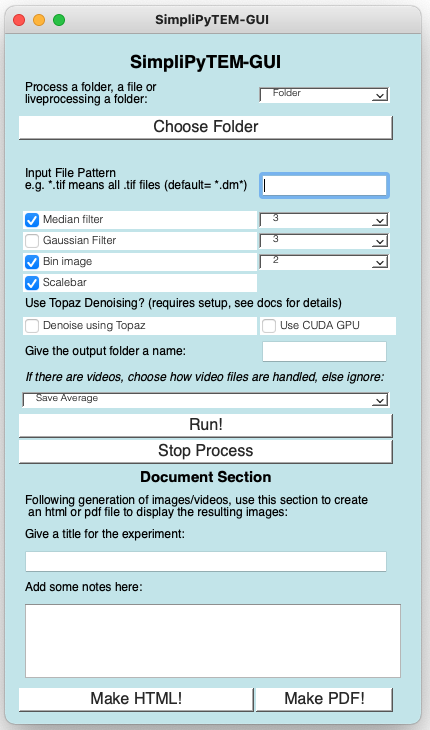
This app is split into two main sections, The top section containing the Image/video generator.
Step 1: You can either select a folder, a file or run live processing:
Folder - process each file in the folder
File - process a single file
Live processing - process new files which appear within the folder.
Step 2: Select folder/file needs to be selected using the ‘Choose Folder’ button, this should open a file dialog where you can navigate to the intended folder/file.
Step 2: Choose your files by selecting a file pattern. There are two wildcard options:
? - Any single charactor can replace a ?, this can be used for filenames like imgNumber0??.tif
‘*’ - * means anything, as long as the other parts of the pattern also work. * can be used to say any files of a particular filetype, e.g. .tif, *.dm4 or can be used more specifically ImageNumber.tif for example.
Input filetypes allowed include digital micrograph files (.dm3, .dm4), .tif , .png, .mp4, .avi, .mov
This was first designed for .dm? files so these are best here (particularly for metadata), but all these files should be available.
Note that if you are only running for a single file, this can be ignored.
Step 4: Choose processing options. The options below are the basic processing options available, these are:
Median filter - applies a median filter to reduce salt-and-pepper noise in the output. The number next to it denotes the kernal size of the filter
Gaussian filter - applies a gaussian filter to smooth the output. The number next to it denotes the kernal size of the filter
Bin image - Reduces the size of the image on the x&y axis
Scalebar - Adds a suitably-sized scalebar to the image
- Denoise with topaz - This is the most dramatic processing option, it uses Topaz denoising (https://doi.org/10.1038/s41467-020-18952-1) to dramatically reduce the noise in the image.
It is good for identifying low resolution features through the noise, so can be worth trying for noisy datasets. This does require significant computational power, and works much faster with a CUDA GPU Before use, you need to run pip install topaz-em in the command-line when in the SimpliPyTEM conda environment, this only needs to be done once.
Use CUDA GPU - Do you want to use a CUDA GPU when denoising with topaz, if available it will dramatically increase processing speeds.
Step 5: Give an output folder name. The images will be saved in a directory called Images, and the videos in a directory called Videos. These can be contained in an extra directory, which is particularly useful for holding html/css files you may wish generate later.
You can leave blank if you wish.
Step 6: Choose how videos should be saved. Ignore if videos not being used. Videos (digital micrograph image stacks, .mp4, .avi files) will be recognised, and can be saved in a number of options:
Save Average - Saves a time-average of the frames in the video
Save Video as MP4 - Save video as mp4 file (good for making an html)
Save Video as AVI - Saves video as an avi file, this avi filetype should be openable with ImageJ but is awkward to use elsewhere…
Save Tif Sequence - Saves each frame of the video as tif file
Save Tif Stack - Saves a single file with all the frames contained, good for using with ImageJ
Save MotionCorrected average - Motioncorrects video using motionCor2 (executable must be set, see motioncorrection page)
Step 7: Hit RUN! Files will be processed.
Section 2: Document Generation
This section handles the generation of html or pdf documents containing your images/videos for easy post-experiment image evaluation and sharing.
The videos are found based on the folder choices in section 1, but will work even if you haven’t Run! this section. To generate the document do as follows:
Choose folder with the raw data by clicking ‘Choose Folder’ Choose output folder name within this in the ‘Give’ output folder a name’ box (leave blank if you are happy with the same folder).
The key point here is that this folder (or the previous folder if this one is blank) should have a folder called ‘Images’ in.
Add an experiment title and/or notes about the experiment in the boxes in the document section
Click ‘Make HTML!’ for an html file (this also generates a .css file to improve the style of this doc) Click ‘Make PDF!’ for a pdf file.